I’ve been using Instagram since its inception. I’ve seen it evolve from just a photo-sharing platform to a full-blown marketing platform. And I have to admit: the geotag Instagram feature is one of my favorite additions to the platform.
It has made it easy for people to discover new local businesses. If you’re a business owner or a marketer, I have one piece of advice: Always add geotags to your IG posts.
It’s a simple yet effective way to make your business more discoverable and attract more customers. If you are not sure what geotagging on Instagram is and how to add a geotag on Instagram, this post is for you.
I’ll cover all the basics and even include tips so you make the most of the geotagging feature on IG. Let’s get started!
What is an Instagram Geotag?
An Instagram geotag allows you to share the location of your posts and other content in a geographic tag. When you post an image or video, location tags will appear as a small location tag in the upper-right corner of the post.
When clicked, it will open as a map showing exactly where the post was taken. Using the Location Sticker, you can also add geotags to your Instagram Stories.

Why You Should Use Location Geotags on Instagram?
Geotags can increase the overall discoverability of your posts and they can even appear in the Explore Feed when people explore different locations.
Using location geotags on Instagram, you can also engage with local audiences and collect user-generated content. Plus, posts with a tagged geographical location get 79% higher engagement than posts that don’t have one.
When Should You Add a Geotag on Instagram?
If you want to reach out to a local audience or own a local business, you should always add a geotag to your posts and Stories.
Even if you’re hosting or attending an event, adding a geotag lets your audience know where to find you. And if you have certain products available only in specific locations, add geotags so users know where they can find them.
Understanding How the Instagram Geotag Feature Works
Before we dive into the process of adding and editing geotags, I want to make sure you understand this geotagging process completely. Here are some features associated with it:
• Search & Explore: Geotags on Instagram enable users to search and explore the content shared by people in a particular area. This allows users to discover the best local spots, find exciting events and activities, or even connect with fellow Instagrammers in their area.
Here’s an example.
When I typed “Sacramento, California” in the search bar and checked location results on IG, this is what I saw on the Explore page:
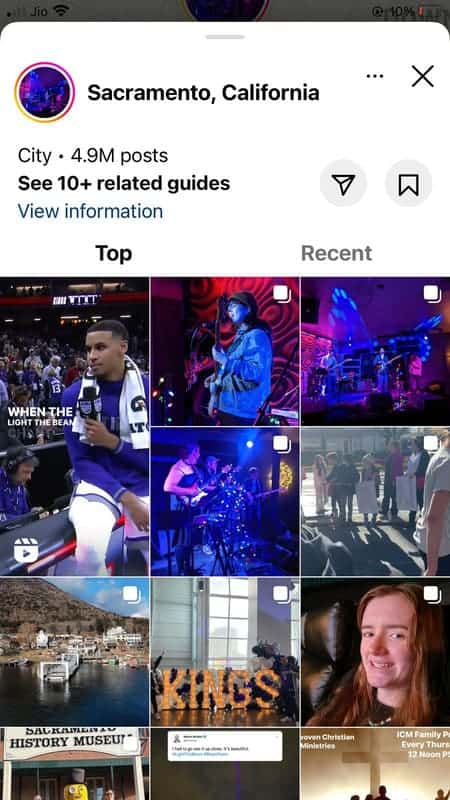
I scrolled a bit and saw all sorts of posts about local events, product launches, and monuments. In the process, I also discovered a new local business via a post on the Explore page.
Here’s the post:

If I click on the map, Instagram also shows collections for the location I have chosen. As you can see, I can look for restaurants, cafes, hotels, bars, and more using this feature.
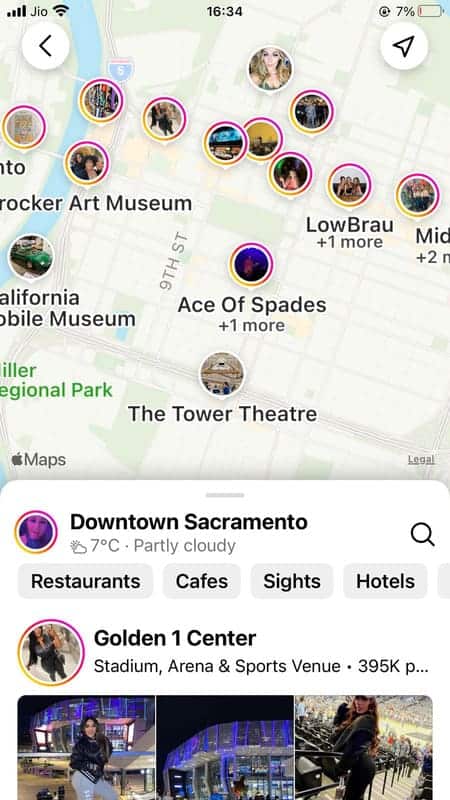
Let’s check out the restaurants in Downtown Sacramento. Here are the results I see on Instagram:
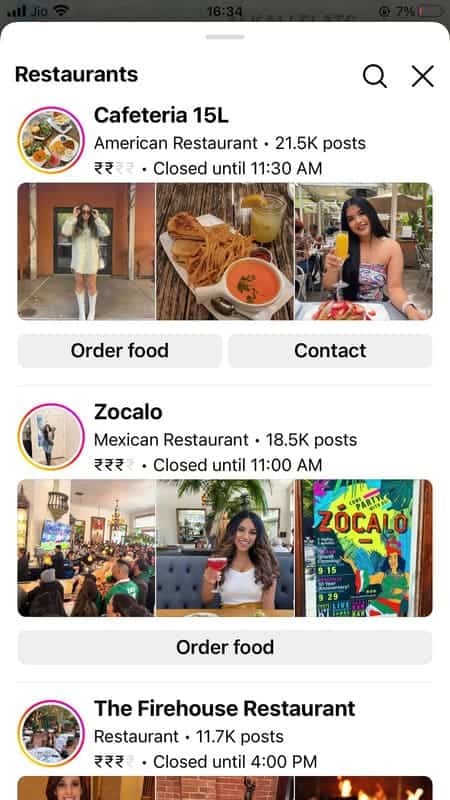
When I click on a restaurant listing, I can find the exact address, business hours, and other information related to the business. For this specific restaurant, I can even order food from within the Instagram app itself.
When I click on “Order Food,” IG takes me to this restaurant’s page on DoorDash.

In a nutshell, you can not only boost your business' visibility and increase engagement but also get more sales.
• Location-Specific Stories: With geotags, users can also share location-specific Stories on their profiles. This helps people discover local hidden gem that they may not be aware of otherwise.
You can also share Stories in which customers have used your business’ geotag. Here is an example from Eataly on Instagram:

Now you know that adding a geotag on Instagram is important, but how do you add one? Let’s discuss that in the next section.
How To Add a Geotag to an Instagram Post
Adding a geotag to your Instagram post is surprisingly easy. It only takes a few extra seconds while you are uploading your IG posts. Here is a step-by-step tutorial on how to add geotags to your Instagram posts:
Step 1: Log in to your Instagram account.
Step 2: Create a new post by clicking on the “+” icon on the top right corner of your screen. Alternatively, you can also swipe left and select the “Post” option from the bottom line to create a new Instagram post.
Step 3: Select the photos or videos that you want to add. Click on “Next.”
Step 4: Edit the photos/videos as per your requirements. Once you are done, click on “Next” again.
Step 5: Write a caption and tag the people you want in your Instagram post.
Step 6: Click on “Add Location.”
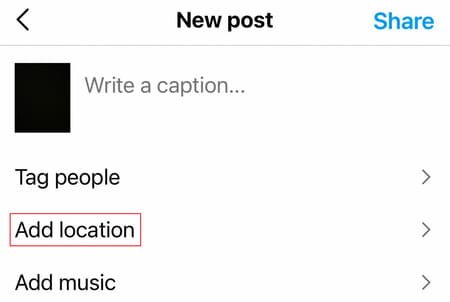
Step 7: Type the location that you want in the search bar.
Step 8: Select the best fit from the options in the drop-down menu.
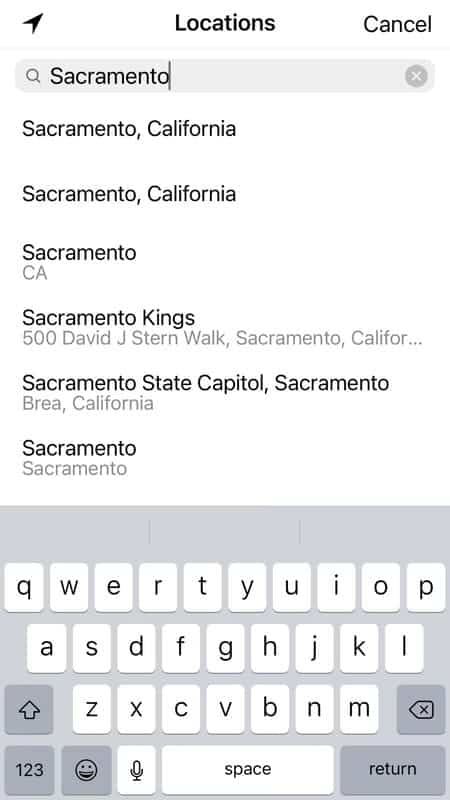
Step 9: Add music to your post if you want and then click on “Share” or .
That’s all. Your post should reflect the tagged location under your username. When a user taps on the location, they will be able to see it on the map along with other posts from the geotagged location.
How to Edit Geotags in Instagram Posts
What if you’ve added a geotag to your Instagram post but want to change it at a later date?
Maybe you thought it would be a good idea to add your home city to your posts, but now you’re expanding. Or you ended up attending an event in London but the geotag says “New York.”
Whatever the reason, know that you can always edit your geotags. They’re not set in stone. In this section, let’s take a look at how you can edit geotags in Instagram posts.
Step 1: Open the Instagram post that you’d like to edit the geotag for.
Step 2: Click on the “…” icon (three dots) that you see beside your Instagram username.

Step 3: Choose the “Edit” option.
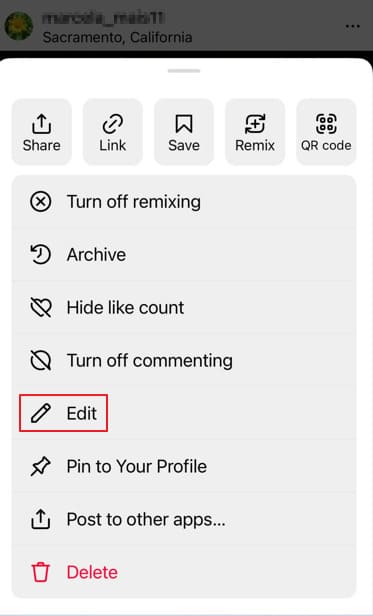
Step 4: Click on the location and choose either of the two given options: Remove Location or Change Location.
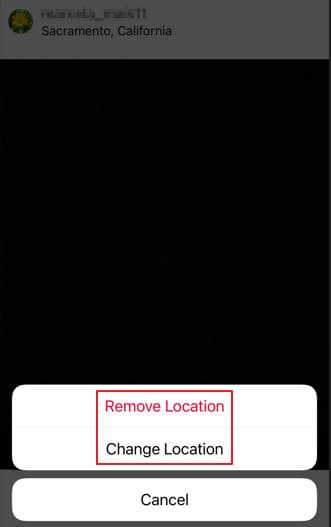
Step 5: If you choose the first option, Instagram will remove the location from your IG post. When you click on “Done,” the changes will be reflected in your Instagram account.
Step 6: If you choose the option to “Change Location,” you can type another location in the Search bar. Choose the best fit from the options given below. When you click on “Done,” the new location will be shown in your Instagram post.
The whole process takes just a few taps and a few seconds of your time, making it quick and easy to edit a geotag on Instagram!
Till now we have discussed how to add and edit geotags in Instagram posts. Next, let’s understand how to add your location to Instagram Stories.
How to Use Geotags or Location Tags in Instagram Stories
If you’re looking for an effective way to make sure that your Stories reach the right people, then geotagging is the way to go. In this section, let’s take a look at how you can add geotags to your Instagram Stories.
Step 1: Log in to your Instagram account.
Step 2: Create a new post by clicking on the “+” icon on the top right corner of your screen. Alternatively, you can also swipe left and select the “Story” option from the bottom line to create a new Instagram Story.
Step 3: Create a Story and click on the Stickers icon – it’s the second one in the top right corner.
Step 4: Click on the “Location” Sticker.
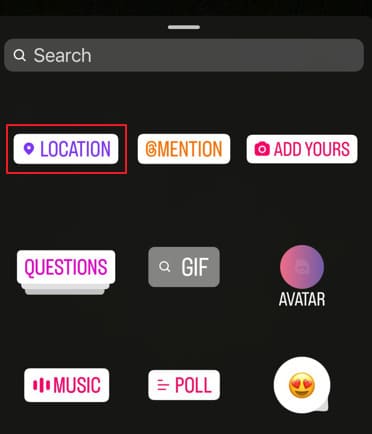
Step 5: Type a location you’d like to add to the Search bar.
Step 6: Select the best fit from the options given below.

Step 7: Post the Story and you’ll see a location tag on it.
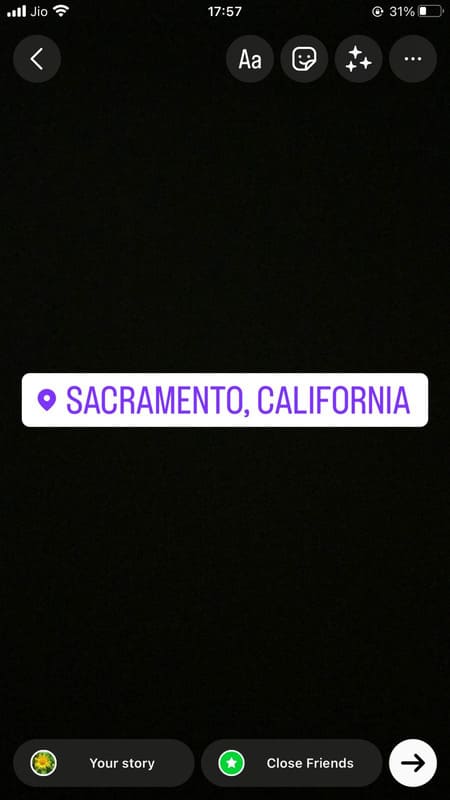
Once you have published a story on Instagram with a location tag, it is not possible to edit the location tag afterward. This means that if you accidentally tagged the wrong location in your Story, there isn't much you can do about it.
However, if you still want to change the location of your Story after posting it, you can delete the original Story and repost it with the correct location tag.
How to Create a Custom Instagram Geotag
What if you want to create your own location tag? You can create a custom Instagram geotag for that! As the name suggests, a custom Instagram geotag is a location tag that you can create on your own. It may not be previously marked on the platform.
When you create a custom geotag on Instagram for your business, it allows customers to find and access your Story more easily. Additionally, using a custom geotag helps customers quickly identify that they are in the right location when visiting your store or event.
It also provides more ways for potential customers to discover and learn about your business – such as when other users “check-in” at your store or share photos of their experience.
You will be able to track how often customers use your geotag, giving you insight into customer habits and loyalty.
Now you know that adding it is beneficial, let’s take a look at how you can create a custom geotag for your business.
Step 1: Open your Facebook account and add a post from it.

Step 2: Click on the “Check-in” option.
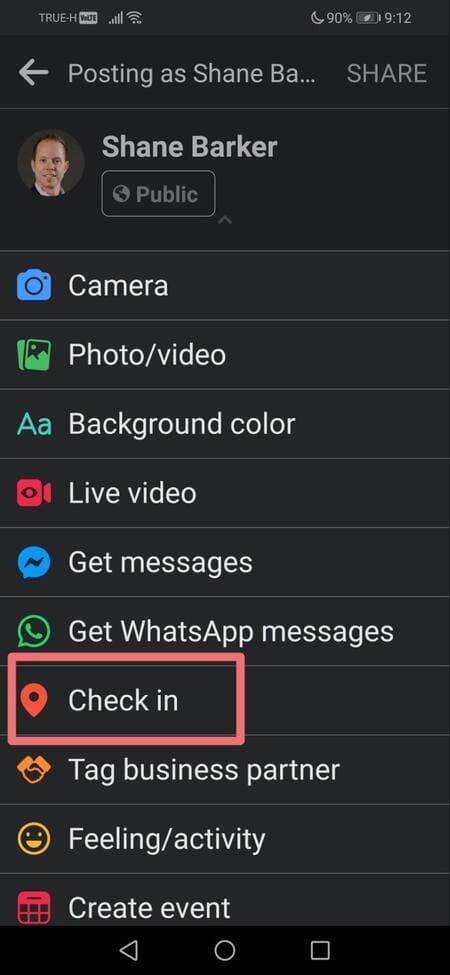
Step 3: Give permission to Facebook to find your location or add it manually on the given map.
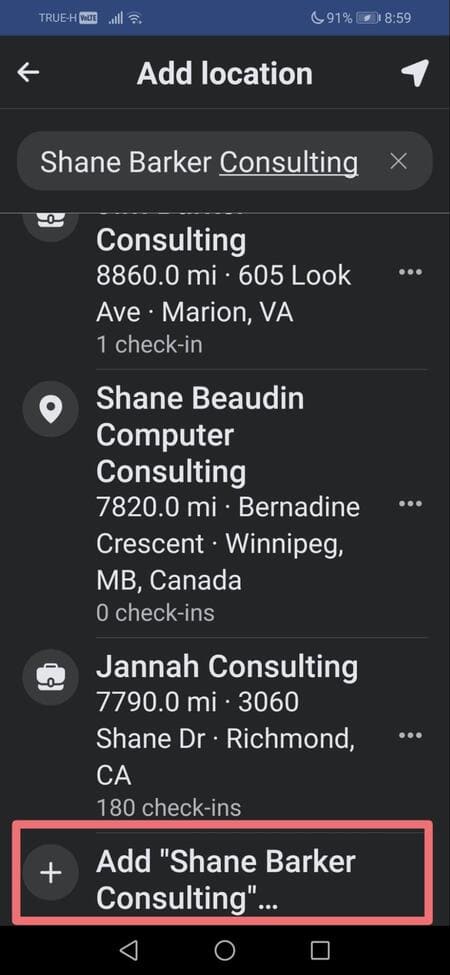
Step 4: Add the name of your custom location in the Search bar and click on the “+” icon you see at the bottom. If someone already has created a location that’s yours, don’t worry! You can still create a new one on Facebook.
Step 5: Once you add the location details, click on “Save Custom Place.” Your new location will be available on Facebook as well as Instagram.
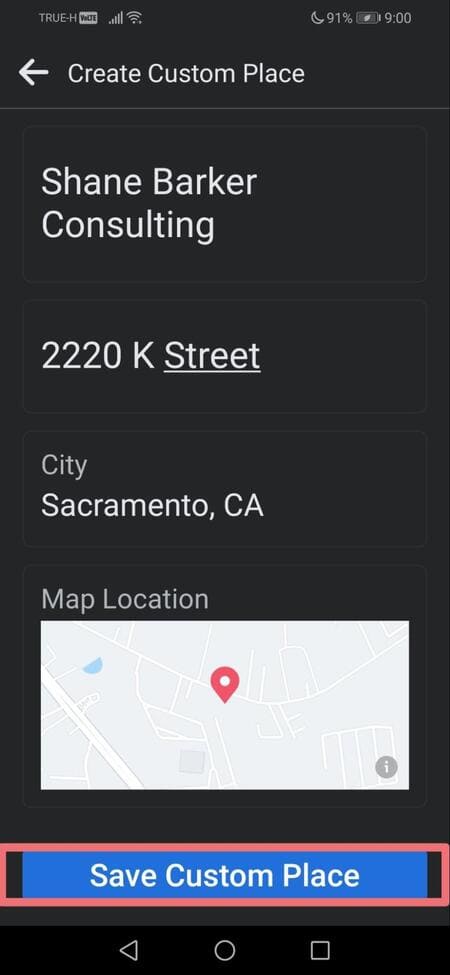
Step 6: Follow the steps to add locations on Instagram posts or Stories to add this newly created custom location.
Whenever you add a custom location on Facebook, the platform creates a new business profile page for it. And after a while, it shows on Instagram as well.
I know it seems a little complicated, but Instagram doesn’t want too many users creating locations on the platform itself. So, the method is a little indirect – via Facebook.
In case, the above steps aren’t working out for you, here is a useful video I found on YouTube. It should explain the process clearly:
If you follow the above steps and you still can’t see the location, it may be because of the following reasons:
- The platform is taking a while to register your newly created location.
- The platform doesn’t view your location as valid because of insufficient details added.
- You haven’t claimed a business profile page.
- Your location settings are not turned on.
- There may be a temporary glitch.
Is it Possible to Create a Custom Location Tag on Instagram Without Using Facebook?
No, it is currently not possible to create a custom location on Instagram without using Facebook. The two platforms are linked, so any changes made on one will affect the other.
That being said, you can still check in to places outside of Facebook-created locations and add your own tags to make those posts more easily searchable. This does not create a dedicated location, but it can help you build a presence in places that may not already have one.
5 Tips to Use an Instagram Geotag to Engage More with Local Followers
Geotagging is an underrated yet powerful tool available for Instagram marketing, and it can be used in a variety of ways. In this section, we will discuss how you can use Instagram geotags to your advantage to increase visibility and reach a larger audience.
1. Give Incentives for Geotagging IG Posts
One way to incentivize users to use your Geotag is by offering a special discount or promotion when they check in at your physical location. This encourages them to show their followers that they are engaging with your brand and can result in more followers for you.
Additionally, if user posts about their experience at your store and tags the correct Geotag, it could appear on the Explore page. As a result, you could reach a wider audience, and boost your brand visibility organically.
2. Add Location-Centric Hashtags
Use location-based hashtags with Instagram geotagging to target local customers. By including location-based hashtags with Instagram geotagging, businesses can increase their visibility and get on the radar of local customers.

Using the hashtag “#texasbusiness,” this business is making sure that they are reaching users who are looking for Texas-based businesses. And other users who look at the post get added context of where the business is located. It’s a clever way to use hashtag marketing to get seen.
Additionally, it is also worth considering using regional and country-specific hashtags such as “#westcoastusa” or “#usabusinesses” to further expand the reach of your Instagram posts. Doing so will ensure that you have a larger but focused pool of potential Instagram followers and customers.
3. Team Up With Influencers
Partnering with influencers can be a great way to boost the visibility of your custom Instagram geotag. Not only will they attract more followers, but they’ll also be able to target customers that are in the same area as your business – making them much more likely to visit or buy from you.
Influencers are also more likely to be seen as authentic by their followers, and this authenticity can help you establish a loyal customer base.
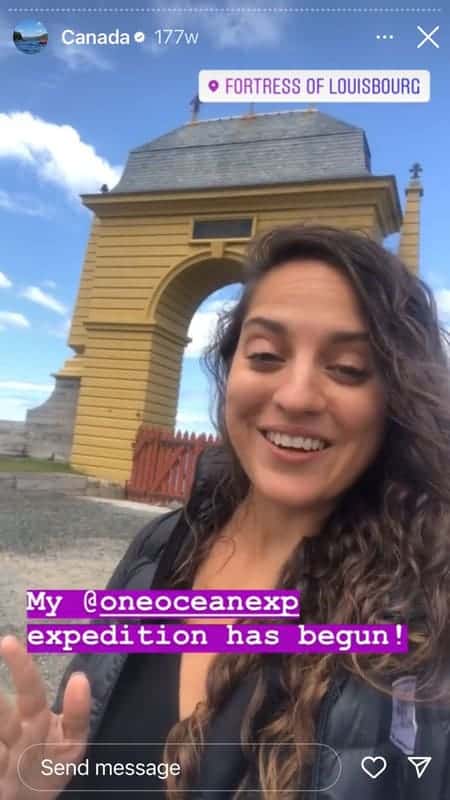
By collaborating with local influencers, you’ll also be taking advantage of the power of word-of-mouth marketing – another effective way to reach potential customers.
4. Add Comments to User Posts
Commenting on user posts that geotag your business location is a great way to build customer loyalty and relationships. Not only does it show that you care about your customers, but it also shows appreciation for the customer taking the time to share the post.
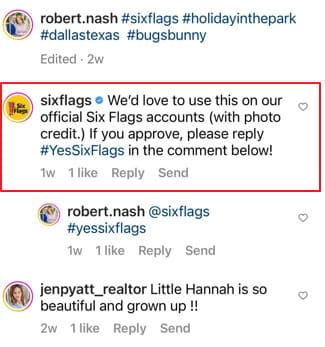
When you comment on their post, more people will likely see it, which can potentially lead to more customers. This type of engagement also encourages other people to post about your business, which can help spread the word and increase brand awareness.
5. Add Geotags at Your Audience’s Location
Geotagging an Instagram post can be a powerful tool for ecommerce businesses that don't have physical stores. Geotags allow business owners to identify their audience’s location and target them with relevant content.
This increases the chances that followers from a certain region will engage with the post and also helps establish brand recognition in that area.
Ready to Add Instagram Geotags to Your Posts?
Adding a geotag to your Instagram post can be the perfect way to add context and give extra information about where you are or what you’re doing. It also helps other users find your content more easily when they search for posts in that location.
By taking advantage of geotagging on Instagram, you can help increase engagement with your posts and expand your reach. So get out there and start tagging!
Do you have any questions related to using the Instagram geotag feature? Please let us know in the comments section below. I’ll be happy to answer them for you.


Related Articles
15 Best Instagram Marketing Tools to Grow Your Reach
Unlock Your IG Potential: Master How to Monetize Instagram
17 Best Instagram Analytics Tools to Track and Improve Engagement
How to Grow Your Instagram Account in 2024 [Free Tool Inside]
Your Guide to Using Instagram Hashtags in 2024
Want to Buy Instagram Followers? Beware of These Risks [Free Tool Inside]